Archive for September, 2011
Easy Chicken Wild Rice Soup
Sep 27, 2011 Author: Jessy | Filed under: Food
1/2 cup onion, finely chopped
1/2 cup carrot, finely chopped
2 quarts chicken broth
1 lb cooked shredded chicken breasts
3 tablespoons butter
1/2 cups flour
Pepper
Flour Tortillas
Sep 21, 2011 Author: Jessy | Filed under: FoodTacos are good. Tacos with home made flour tortillas are awesome!
One day I was going to make shredded chicken tacos for dinner, everything was almost finished, chopped the veggies, reached in the crisper drawer, and there were no flour tortillas! I almost fainted! My son was napping so I could not just run to the store, it was cold and snowy outside, so I didn’t feel like making a special trip to the store. I decided it was time to figure out how to make my own flour tortillas.
I started researching and there were not very many recipes for flour tortillas out there, plenty for corn tortillas but we are Minnesotans, we only use corn tortillas when we are really feeling crazy! Many recipes included lard, or shortening, some had tons of oil, I wanted to make some that were not super bad for me and used ingredients that I always have in my house, and no, I don’t have any lard in my house!
Spend about an extra 15 minutes on cooking up your own tortillas, regular store tortillas don’t compare.

Ingredients:
2 Cups Flour
1 1/2 Teaspoons of Baking Powder
1 Teaspoon of Salt
2 Teaspoons of Vegetable Oil
3/4 Cup of Lukewarm Milk
Spray Canola Oil
Salt shaker
Rolling Pin
Directions:
Stir together the wet ingredients, mix together the dry ingredients and slowly add to the wet.
Just mix it with your hands, you need to use your hands to get it all mixed in and incorporate any dry ingredients into the dough ball.
Divide the well mixed dough ball into 8 balls. Pat each ball flat on a clean flat surface.

Heat a skillet to medium heat.
Using a rolling Pin roll out each ball into about an 8 inch circle, trying to make it as flat as possible. (Mine are not always round, some look like amoebas, but as long as they can hold the food, they taste the same)

Transfer rolled flat tortilla onto the hot skillet, spray one side with one quick burst of spray canola oil cooking spray and a sprinkle of salt.
Cook for about 30 seconds on each side and flip. They should be slightly golden brown.

They will come out chewy on the center, with a nice crust on the outside, they puff up slightly when cooking.
I store them in aluminum foil to keep them warm until dinner is served.
After you eat your first one plain, you will see how much better a taco tastes with a fresh, warm, home made tortilla!
When you master this, jazz them up with adding other spices to the recipe, like some chili powder, cayenne pepper, or cumin.
Car Seat Recommendations
Sep 21, 2011 Author: Jessy | Filed under: Health & SafetyWhen my daughter was born six years ago, I carefully followed the car seat recommendations, used the infant car seat until she was 20 lbs, moved her to a convertible car seat when she was too heavy for her infant seat, made sure I waited until her first birthday to turn her convertible car seat forward facing, kept her in her convertible car seat until she was too big for her five point harness straps, then moved her into a high back booster seat at age 3. The current recommendations have changed!
Current Minnesota Car seat Law is as follows:
- All children age 7 and under must ride in a federally approved car seat or booster seat, unless the child is 4’9″ or taller.
- Safety seats must be installed and used according to the manufacturer’s instructions.
- Infants (under 20 pounds and one year of age) must be in a rear-facing safety seat.
- Driver is responsible.
- Petty misdemeanor fine for violation is $50
- Applies to both residents and non-residents of Minnesota.
American Academy of Pediatrics (AAP) now recommends keeping children rear-facing until 2 years old if possible. Legally you need to keep them rear facing until age 1 and 20 lbs. Protect their fragile neck and spine from accidents by keeping them rear facing as long as possible. Some car seats can accommodate rear facing children until age 4.
Children should remain in a forward facing, harnessed car seat until they are 4 years old or as long as they can comfortably fit and are within the car seat manufacturers recommended height and weight allowances. Many 5 point harness car seats sold today accommodate children up to 65 pounds.
Don’t move to the booster seat especially the backless booster seat until they are 40 lbs, and 4 years old. They will remain in a booster seat for a long time, until age 8.
Children are not ready for a seat belt only until they can sit safely in the seat belt, with the lap belt across their thighs and the shoulder harness across their shoulder and chest, not across their neck. They are legally not ready until they are age 8 and 4 foot 9 inches in Minnesota!
If your car seat is older than 6 years throw it away and buy a new one!! Your child’s life is worth it! I cringe when I see people using a car seat clearly made in the 80’s, the technology improves constantly to keep your children safe, please don’t use an outdated car seat.
Keep your kids in the backseat! Children should remain in the backseat until age 13!! They are used to riding in the back of the car, they will have plenty of time to ride in the dangerous front seat when they learn to drive.
http://www.flickr.com/photos/40986460@N02/6150727282/sizes/l/in/photostream/
This is an excellent visual for knowing which type of car seat to choose and the safest age ranges for each.
Zucchini Bread
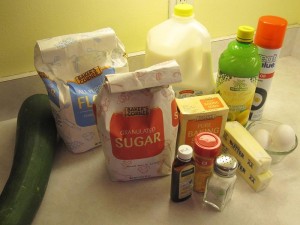
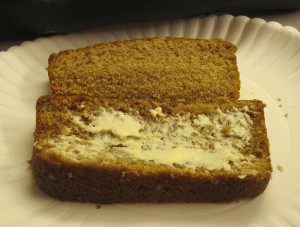
Sep 21, 2011 Author: Jessy | Filed under: FoodWhat the heck do I do with all of these zucchinis from my garden? I have eaten zucchini baked, fried, steamed, cut it up and have fully stocked my freezer for the winter. It is time to mix it with flour, butter and sugar and make zucchini bread!
I tried a few recipes, one was too dry, one was just boring, so I improvised over the last few batches and made my own recipe.
Ingredients:
2 1/2 cups of flour
2 1/4 cups sugar
1 teaspoon of salt
1 teaspoon of baking soda
2 teaspoons of cinnamon
2 teaspoons of vanilla extract
3/4 cup butter
2 eggs
1/2 cup of buttermilk (No buttermilk? Just substitute 1/2 cup milk mixed with 1 teaspoon lemon juice)
1 1/2 cups of peeled, shredded zucchini
Directions:
Preheat oven to 350 degrees, grease two large loaf pans, I always use glass baking dishes to avoid the non-stick pan dangers.
Peel zucchini, and either grate or use a food chopper to chop it up into tiny bits, make a finely chopped, no big chunks.
Add flour, sugar, salt, baking soda, cinnamon, vanilla, butter, buttermilk, eggs, and zucchini and mix with a hand or stand mixer until well blended.
Pour mixture into the two greased loaf pans
Bake for approximately 1 hour 15 minutes, test with a toothpick to see if it comes out dry and clean from the center of the loaf to see if it is done. I always use glass baking dishes to avoid the non-stick pan dangers.
Allow to cool completely in pan! I am always impatient and want to eat the warm bread right out of the oven, so I usually sacrifice one loaf to the warm bread lust. If you want to show it to anyone in one intact, pretty loaf, wait, even if it kills you! Loosen the edges of the bread with a butter knife and tap the bread pan to remove it.
Enjoy!
Categories
- Family Management (26)
- Food (21)
- Health & Safety (32)
- Home & Garden (13)
- Park Reviews (4)
- Product Reviews (12)
- Projects and Crafts (2)
- Short Stories (23)
- Think About It (25)
- Uncategorized (6)
Top 10 Lists
Blogs this Month
Archives
- August 2016
- June 2015
- July 2014
- April 2014
- January 2014
- January 2013
- December 2012
- September 2012
- August 2012
- May 2012
- February 2012
- January 2012
- September 2011
- February 2011
- January 2011
- December 2010
- November 2010
- October 2010
- September 2010
- August 2010
- July 2010
- June 2010
- May 2010
- April 2010
- March 2010
- February 2010
- January 2010
- December 2009
- October 2009
- September 2009
- August 2009
- July 2009
- June 2009
- May 2009
