Archive for the ‘Food’ Category
Focaccia Bread
Dec 21, 2010 Author: Jessy | Filed under: FoodI decided to try something that I never thought I could do, make bread. There was always something really ominous about baking bread without using a box kit or a bread machine. I was craving good bread to dip in olive oil, balsamic vinegar and Parmesan cheese so I decided instead of forking out the $5-$7 bucks for the fancy artisan bread at the store, to try to make it myself. I also wanted to have a chance to use the dough hook on my Kitchen Aid Stand mixer, after 8 years, I finally learned that is what it was used for!
I pulled out my stand mixer and got started.
Here is what you need.
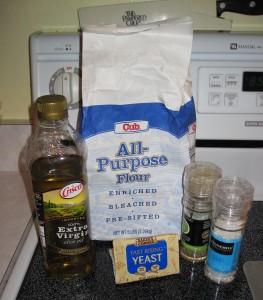
1/3 cup warm water
1 tablespoon sugar
1 packet active dry yeast
2 cups of flour, all purpose or bread flour
2.5 tablespoons olive oil, divided
1 teaspoon salt
Italian seasonings 1/2 teaspoon
Shredded Parmesan cheese- sprinkle
In the mixing bowl pour 1/3 cup warm water add 1 tablespoon sugar and packet of dry yeast, mix with spoon until moistened. Let stand for about 10 minutes until creamy and frothy.
Add 2 cups flour to the yeast mixture
Add 1/2 teaspoon of salt to the mixing bowl
Turn on mixer on slow mixing with a bread hook if you have one.
Slowly add water about 1 tablespoon at a time until the mixture forms into a dough ball. (about another 1/2 cup water)
Remove the dough ball from mixer and knead lightly on a flat surface sprinkled with flour.
Lightly oil the mixing bowl with about 1 tablespoon of olive oil.
Return the dough ball to the oiled mixing bowl, roll the ball in the oil.
Cover the mixing bowl with a warm, slightly damp cloth and let rise in a warm area.
Allow the dough to double in size, about 30 minutes later.
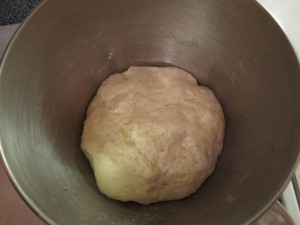
Preheat oven to 475 degrees. (Seriously 475 degrees!)
Shape the dough into a loaf on a flat slightly oiled cookie sheet.
Poke about 30 small dimples into the dough with something like a chopstick.
Mix the remaining 1 1/2 tablespoons of olive oil with the 1/2 teaspoon Italian spices and 1/2 teaspoon salt.
Use a basting brush and brush all of the oil, salt, and seasonings mixture onto the top and sides of the shaped dough. The seasonings will infuse the bread with the dimples.
Sprinkle shredded or grated parmesan cheese on the top of the oiled, seasoned bread, this will make it look pretty!
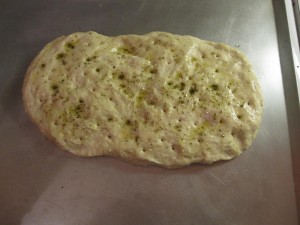
Place oiled and seasoned dough into the preheated oven and bake for 12-18 minutes depending on how dark and crusty you want your bread. If you want it lighter bake for 12.
I like my bread crusty so I baked the top for about 15 minutes, I flipped the loaf and baked the underside for 3 minutes.
Take it out of the oven, let it cool as long as you can stand to wait, and enjoy!
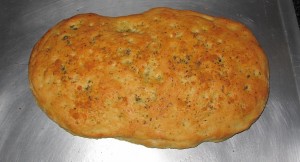
You just made your own artisan bread for about a buck.
Use it for sandwiches, dinner bread, or dipped in olive oil, balsamic vinegar and Parmesan cheese with a glass of wine. Sounds like a perfect dinner to me!
Easy Homemade Yogurt!
Nov 17, 2010 Author: Jessy | Filed under: FoodI was inspired to make homemade yogurt yesterday. There are no preservatives, I can control the sugar and fruit, It is incredibly inexpensive and I am not using additional energy to produce yogurt containers. My friend recommended a website that used a double boiler, sterilized equipment and a candy thermometer and I am not going to lie, I was intimidated! The last time I needed a candy thermometer I ended up with a caramel flavored rock stuck to the bottom of my non-stick pan. I went out searching for other recipes and found Crockpot365 A Year of Slow Cooking site and found her homemade yogurt made in a crockpot. I decided to give the crockpot method a try with a few alterations because quite honestly it looked easy!
I pulled out my old school, 3 quart crockpot you know the one that has the 1970 brown pattern that I got as a hand me down, and went to the store.
Have these ingredients on hand:
1/2 gallon of milk
1 quart of plain yogurt with live active cultures
Honey, I got mine at the farmers market
Pure Vanilla Extract
Frozen fruit of your choice, I used 1 bag of Organic strawberries, organic blueberries and one banana.
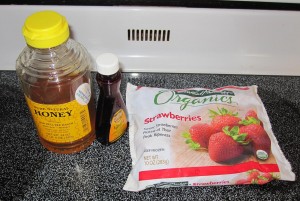
I purchased 1/2 gallon of 2% organic milk. I purchased a container of plain yogurt with live, active cultures as a starter. Plain, not vanilla, not strawberry, not key lime pie, just plain.
I poured the whole 1/2 gallon of organic milk in the crockpot and cooked it on low for 3 hours.
In the crockpot you don’t have to worry about the milk scorching, I trust my crockpot to keep the temperature consistent without using a thermometer.
After 3 hours I unplugged the crockpot and let it sit on the counter at room temperature with the cover on for an additional 3 hours.

After 3 hours of sitting, I pulled out 1 cup of now warm milk and added 1/2 cup of plain yogurt with live active cultures. I stirred the milk and yogurt together and then stirred it into the rest of the milk in the crockpot using a wooden spoon.
I wrapped the whole crockpot up in a large beach towel and kept it on the counter for 8 hours. Don’t disturb it, don’t stir it, don’t jiggle it, don’t open it even if it kills you, resist! This was the part where I was glad I went to bed because man did I want to peek!
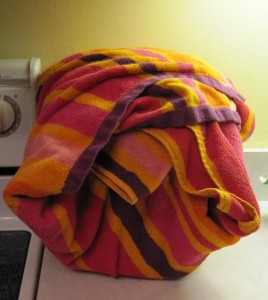
I set my alarm for 3 AM which was 8 hours later, because I did not want to let it over process, I read that if you let it sit for too long it will continue to get thick but it will also continue to get more bitter.
Stir the yogurt to mix the water in with the yogurt and to make it smooth and then I put the whole crockpot into the fridge. I was tired, it was 3 AM! Surprise, surprise, I woke up to yogurt, it looks like yogurt, it smells like yogurt, it tastes like yogurt, heck it is yogurt!
I pulled out 1 cup yogurt for the next batch to use as a home made starter.
I then separated the remaining yogurt into 3 bowls.
It was slightly watery so I drained some of the water out with coffee filters to thicken it up. I drained about 1/2 cup of water out of each of the three containers.
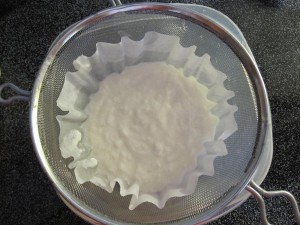
The first one I put the yogurt into the blender and added a banana and blueberries and about 2 tablespoons of honey to it. I blended it up and it came out soupy. I poured it into a container and put it in the fridge and it set back up a little, but it was still more watery than normal yogurt consistency. I say this was my test batch, tastes great, but I wanted it thicker.
The second one I wanted to try vanilla and honey yogurt. I put 1 teaspoon of pure vanilla extract and 2 tablespoons of honey into the filtered yogurt and stirred it up. It did not change consistency and it was awesome, not soupy at all.
The third one I used a bag of frozen organic strawberries, let them thaw out for about 30 minutes and put them into the blender. I added about 1/4 cup of the pureed strawberries into the filtered yogurt stirred it up but it was not sweet enough. I then added 2 tablespoons of honey to the strawberry and 1 teaspoon of pure vanilla extract and stirred it up with a spoon and again awesome, typical yogurt consistency!
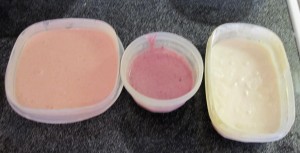
I have eaten a lot of yogurt today, my kids like the vanilla yogurt. I plan to add this to my morning smoothies and I am excited to make my next batch to see what other ways I can use different fruit varieties, next time I might even save some extra plain yogurt to use instead of sour cream. Give it a shot!
Buying Half a Cow
Sep 20, 2010 Author: Jessy | Filed under: Food, Health & Safety, Product Reviews, Short StoriesI have always been a regular grocery store shopper buying my ground beef in bulk and using my vacuum sealer to save money. After watching the news about tainted beef, having to check lot numbers and worrying about the beef I already fed my family, then watching Food Inc. my priorities have changed. If you do not know the dangers of E. Coli Bacteria or have not watched Food Inc. you can find it on Youtube.com. Food Inc. opens your eyes and makes you think about the food you feed your family.
Besides having my own garden each summer, I think it is important to buy locally where possible in order to support local businesses. We live in The south side of the Twin Cities and there are many farms and ranches and farmers markets that make it possible to buy locally. I decided to try to buy a half a cow for my families beef. The search started to find a local, organic, free range cow to buy. The research started around April every local, online ranch being on average $5-8 dollars per pound of beef for certified organic beef. Most were already sold out for the season and they were already taking reservations and deposits for the 2011 season. I remembered that a woman I graduated with from high school and reconnected with on Facebook, mentioned the previous year that she sold cows from her farm, so I contacted her and asked for details.
My High School friends Ranch is located in Afton Minnesota, about 30 minutes south of my house. She had photos of her happy, healthy, young cows on her Facebook page. The cows had plenty of room to roam in grass, they were grass fed on no pesticide grasses, and were hormone free. These are the main important points of why I wanted to buy organic, but her cows also did not have the added cost of the organic certification process. She also had cows available to buy this year!
I put in my order for a 1/2 a cow, we have a big freezer in the basement and I agreed to split 1/4 of the cow with 3 other friends. The average for 1/4 of a cow is $400 and 1/2 a cow is $800 depending on weight.
She messaged me and said that they were bringing the cows in and to expect a call directly from the butcher shop in about 10-14 days. The butcher shop called me 12 days later and I gave them cutting instructions, how I wanted it packaged, (1 lb ground beef packs, 3/4 inch steaks, 2 steaks per package mostly boneless roasts averaging 2-3 lbs per roast.) I explained that I had never done this before to the woman on the phone and she was patient with me describing all of the options and what was common.
They butcher shop called me the next morning and told me I could to come pick my beef up. It was packaged in four large boxes two boxes with ground beef and two boxes with steaks and roasts and already frozen.
It was aged/hung for 10 days for flavor after slaughter.
1/2 of cow this cows dressed weight was 302 lbs
The price of the 1/2 cow including processing was $740.00
The price per pound dressed weight was $2.45
The weight of the beef processed and packaged was 219 lbs
The price per pound of processed and packaged was $3.37
I got about 120 lbs of steaks and roasts and 100 lbs of ground beef. Each package of butcher freezer papered meat is clearly labeled with my name to make sure I am getting my cow and the type and quantity of cut. You may be able to get your choice of cuts less expensive if you get every sale at the grocery store but you have no idea where your meat is coming from. I did not think that $3.37 per pound was too bad considering what you get when you average the cost per cut.
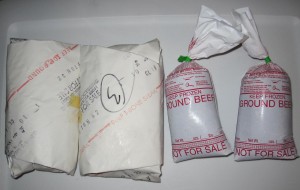
I ended up keeping a full 1/4 of cow split every other cut plus an additional 1/8 (after splitting 1/4 of the cow with 3 friends) of this cow for my family. I believe I kept 3/8 of a cow.
Here is the breakdown of my cuts.
-3 packages of soup bones
-3 packages of stew meat
-3 rump roasts
-1 sirloin tip roast
-1 beef arm roast
-4 beef chuck roasts
-2 beef porterhouse steaks
-9 T-bone steaks
-7 ribeye steaks
-11 sirloin steaks
-6 beef top round steaks
-55 packages of 95% lean ground beef
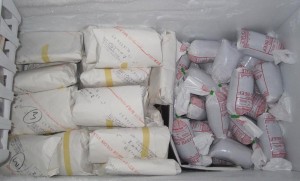
I had no idea what to expect since this was my first half of cow purchased, so I wanted to share my experience with others. I am truly pleased with my purchase, the hardest part was cutting a check for $740 bucks.
The aged beef is very meaty tasting, it tastes like eating a steakhouse steak each time we eat it. The beef adds much more flavor to your food than quickly processed grocery store beef. When you brown the ground beef there is no need to drain the fat, it is about 95% lean ground beef and there is no lack of flavor with the reduced fat. If you could buy 95% lean ground beef what would that cost per pound? The steaks are marbled and fabulous. I have made two roasts and they are flavorful without the 2 inch coating of fat at the top of my slow cooker.
Consider buying a local side of beef, know where your meat comes from, and taste the difference!
Here is the contact information where I purchased my beef: www.majesticpinesfarm.com
Here is the butcher shop who processed the meat:
www.gregsmeats.com
Easy Homemade Granola
Aug 16, 2010 Author: Jessy | Filed under: FoodI love granola! Granola bars, granola cereal, granola people, I like them all! Today I decided to make my own granola instead of buying a box at the grocery store. Making it was so easy and awesome, I had to share!
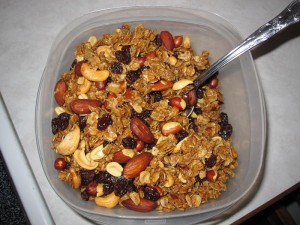
2 and 1/2 Cups of old fashioned oats
1 Teaspoon cinnamon
1 Teaspoon table salt
3 Tablespoons vegetable oil
1/4 Cup honey
1/4 Cup brown sugar packed
1 Teaspoon vanilla extract
1 Cup of salted mixed nuts
1 Cup of raisins or dried fruit of your choice
Mix the salt and cinnamin into the oats stir until mixed.
Whisk together the wet ingredients in another bowl until totally combined, add to the oat and spices mixture. Stir it until all of the oats are covered and no more liquid remains.
Spoon and spread the covered oats onto a baking pan lined with parchment paper (This will save you sticky cleaning later.)
Bake the oats in a 325 degree oven for 15 minutes, stir and flip with a spatula one time in the middle of the 15 minutes.
Sprinkle the mixed nuts on top of the oats and put in the oven for 5 more minutes.
Sprinkle the raisins or dried fruit on top of the oats and nuts.
Quickly Spatula off the granola mixture off the parchment paper and put it into a air tight container, (let it cool before you cover it.)
That is all there is to it! Eat and repeat!
Now I know what I am bringing along on my canoeing trip!
Homemade Peanut Butter
Jun 14, 2010 Author: Jessy | Filed under: FoodI was watching a show one day about unhealthy trans fats in peanut butter. The partially hydrogenated oils that make the peanut butter never separate is unhealthy because it contains trans fats in small amounts. Trans fats are unhealthy because they raise your bad cholesterol, and lower your healthy cholesterol leading to potential artery blockages. Based on the serving size of peanut butter the trans fats might be labeled zero because it is less than .5 g of fat but there is always trace amounts. Trace amounts over a lifetime is not what I want to put in my kids bodies.
My kids love pb&j sandwiches and I have caught my daughter eating peanut butter with a spoon from the jar she loves it so much. I decided I should try to get healthier peanut butter for my family. I tried a few brands without partially hydrogenated oils and I was not overly impressed. They were boring, I decided to try making my own. I found a few recipes I thought sounded good and took parts from each to make this version.
This is a chunky peanut butter recipe with a shelf life of 4 weeks because there are no preservatives.
It is so good, I have a hard time wanting to waste it on toast, it is a treat in itself. My kids love this chunky peanut butter.
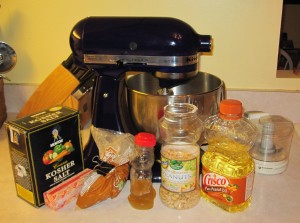
1 1/2 cups of dry roasted, unsalted peanuts
3 tablespoons of honey
3 tablespoons of brown sugar
1 1/2 teaspoons of kosher salt
3 tablespoons of salted butter
4 tablespoons of peanut oil
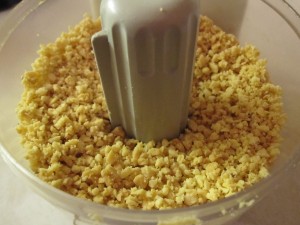
In a food processor chop the peanuts to a chunky, chopped peanut size, not too small to make them grainy and not too big that you can’t spread them.
Put the chopped peanuts in a stand mixer.
If you use salted peanuts, half the kosher salt.
Put the honey, brown sugar and salt in the stand mixer.
Using the food processor again, combine the salted butter and oil, process the two together for about 15 seconds until they are completely blended and creamy looking.
Using a rubber spatula scoop the creamy oil mixture into the stand mixer.
Mix the ingredients on low in the stand mixture until they are well blended and creamy, use the spatula to scrape the sides in the middle.
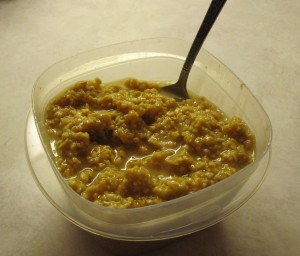
Place the blended peanut butter into a sealed container. It will separate, stir it up before you spread it.
Categories
- Family Management (26)
- Food (21)
- Health & Safety (32)
- Home & Garden (13)
- Park Reviews (4)
- Product Reviews (12)
- Projects and Crafts (2)
- Short Stories (23)
- Think About It (25)
- Uncategorized (6)
Top 10 Lists
Blogs this Month
| M | T | W | T | F | S | S |
|---|---|---|---|---|---|---|
| « Aug | ||||||
| 1 | ||||||
| 2 | 3 | 4 | 5 | 6 | 7 | 8 |
| 9 | 10 | 11 | 12 | 13 | 14 | 15 |
| 16 | 17 | 18 | 19 | 20 | 21 | 22 |
| 23 | 24 | 25 | 26 | 27 | 28 | |
Archives
- August 2016
- June 2015
- July 2014
- April 2014
- January 2014
- January 2013
- December 2012
- September 2012
- August 2012
- May 2012
- February 2012
- January 2012
- September 2011
- February 2011
- January 2011
- December 2010
- November 2010
- October 2010
- September 2010
- August 2010
- July 2010
- June 2010
- May 2010
- April 2010
- March 2010
- February 2010
- January 2010
- December 2009
- October 2009
- September 2009
- August 2009
- July 2009
- June 2009
- May 2009


