Archive for the ‘Product Reviews’ Category
Best Way to Remove Wallpaper
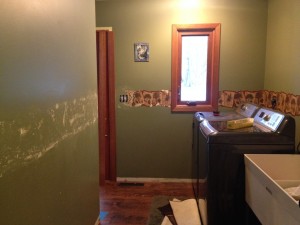
Apr 14, 2014 Author: Jessy | Filed under: Home & Garden, Product Reviews, Projects and CraftsWe purchased a new house a few months back and there was a tree wallpaper border in the laundry room. We were replacing the trim and wanted to repaint the laundry room to match the adjoining great room. The wallpaper border was peeling and curling on the edges so I was sure it would be easy to remove. I made the first rip on one of the loose edges and only got about 1 inch off, now it was too late, I couldn’t go back, I tried the other peeling edge, no better luck.
I remembered the previous homeowner left two gallons of wallpaper remover gel in the basement when they left. I ran downstairs, grabbed a jug, grabbed a sharp knife to score the wall, got a paint tin and a paint roller and started rolling. I scored the heck out of the wall, coated the wallpaper with a thick layer of wallpaper remover and let it sit for 30 minutes. I came back 30 minutes later and was ready for the magic to begin, ready to use my putty knife and watch the wallpaper just fall off the wall with no effort. I pushed the putty knife to the edge of the border and was greeted with a fully stuck border. I scraped and scraped and got nothing, I reapplied the wallpaper remover, and tried removing it after round two, nothing, then I reapplied again and covered it with a layer of saran wrap and let it sit for another 3o minutes, went back at it and was greeted with more of the same, a stuck layer of wallpaper. I tried a new method and used a water spray bottle to saturate the wallpaper that had been coated with plenty of wallpaper remover and finally was able to remove that section with lots of elbow grease. I got small chunks off of the 10 foot area bit at a time from the wall and finally finished one wall after about 4 hours. Yes, seriously.
I know this wallpaper was not properly sized, maybe if the previous homeowner had prepped the wallpaper correctly the wallpaper remover would have worked.
I posted a photo of this frustrating wallpaper removal project on my facebook page with the description, “I am pretty sure they sold this house because they did not want to remove this wallpaper!” I had many suggestions from my friends on how to get the rest off. I could have rented steamer to remove the border but I was only removing a small section of wallpaper so I did not. I wanted to test the typical homeowner wallpaper removal methods recommended by my friends. I decided to try all of them in a side by side test, I also took photos to see what method worked best.
I went and picked up a few supplies from Menards to make the job easier. I got a scraper tool and a wallpaper scorer tool.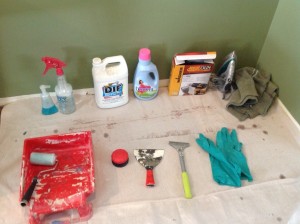
I divided the wall into five separate sections, marked each with a permanent marker, scored those that needed to be scored and started trying each method.
My first section of wall was the hot iron and wet towel method. This is a home made steamer. I soaked the towel, hung it on a hook, so I could have one hand free for the iron and one for the scraper, I pushed the iron on the wet towel to create lots of steam. I was not able to get much off so I quickly scored it in order to get more steam behind the wallpaper. I then tried again. This time I was able to scrape small sections off the wall at a time. About an iron width section at a time, it took some elbow grease, but it worked! It took time, but was much less work than my work the day before.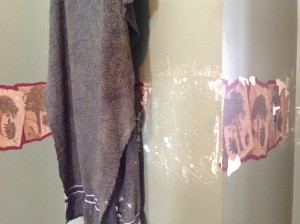
My second section was a heat gun. This was interesting and is what wallpaper pros use to remove wallpaper in office buildings. We had a heat gun, I turned it on High and started heating up the wallpaper to see what would happen. It made the plastic coating melt and I was able to scrape it off with the scraper. I removed the entire plastic coating with a slow but relatively easy process. It was a hot process, the whole room smelt like melted plastic and created really hot walls. It burnt the paper under the plastic in a few places. But the wallpaper base paper was still stuck firm. I said now what, so I sprayed the whole area with my water bottle and actually heard the wall sizzle, it made steam billow from the screaming hot wall, and was able to scrape the paper backing off with no work at all! My big problem in this one was I was afraid with how hot the wall became, I worried about electrical and plumbing behind the wall. It made the sheetrock almost soft and I bubbled the paint in places under the sheetrock. I had to patch the wall in a few places because of the bubbled paint and the nicks in the soft sheetrock. If you were going to rewallpaper and knew where all of your electrical wires were, this would be a great method, maybe with more practice I would have been able to get it. Keep in mind you are basically throwing glowing red heat at your walls.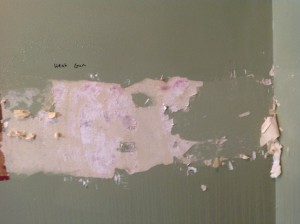
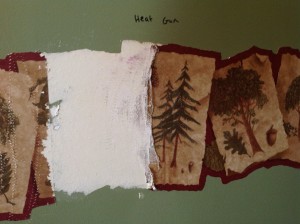
My third section was the fabric softener section, I applied a thick layer of downy to the scored wall and let it sit, applied a second layer, and then tried to scrape the wall, with just fabric softener alone it was not very effective, It worked, but it did not scrape well. I sprayed water from my water bottle and soaked the wall on top of the fabric softener and it came off, a little at a time, small layer at a time but it came off with some effort. This method sure made the house smell great though, if you are into the scent of fabric softener.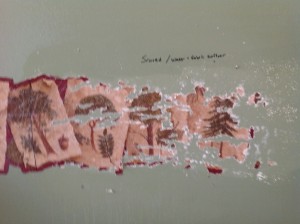
My fourth section was the DIF Gel wallpaper remover again, following the directions, and giving it another shot. I might be a conspiracy theorist but I actually think the remover made the glue adhere to the wall more firmly. It might be DIF’s genius marketing plan, get the consumer to buy more wallpaper remover to remove the wallpaper that the wallpaper remover cemented to the wall. I then tried the same method I used on the painful wall the day before and soaked it with the spray water bottle. I was able to get more off but it was stuck, I actually stopped out of frustration because I was dinging up the wall and working so much harder than I did on the previous three methods, and went to the next section.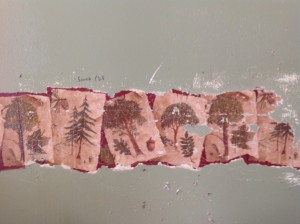
My fifth and final section was a scored wall rubbed with dawn original blue dish soap and sprayed with water. This was amazing! It instantly loosened up the glue! I got the edges off and small sections with the first application. I reapplied and used more water and got the rest of the section off in record time!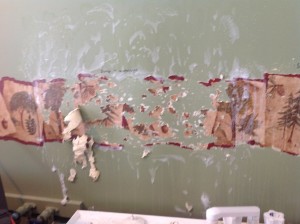
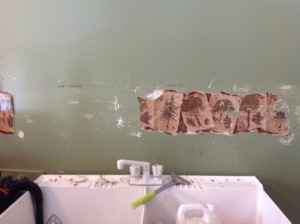
I chose to finish removing the rest of the wall with the dish soap of all of the methods, I felt this was the least amount of effort, mess and work. You can see on my final results which sections did the most damage to the wall. 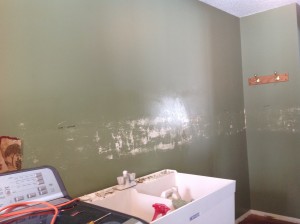
I washed the remainder of the wall off and spackled a thin layer over the wall to cover up the score marks any nicks, burn marks, then sanded, primed and painted the room. I am happy that my laundry room that is no longer 90’s green with a peeling border. If you are trying to remove dreaded wallpaper, hopefully one of these methods will help you have a faster wallpaper removal project!
I am going to talk about something nobody ever talks about, periods. We can talk about babies, deliveries, but periods are taboo. Yes, I am going there!
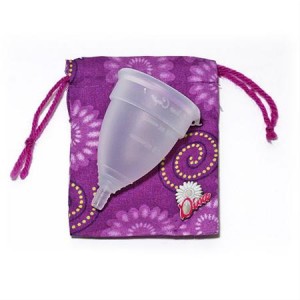
One day while surfing online I was trying to find cheap tampons, I ran across a thing called a menstrual cup. After reading user reviews watching a few Youtube videos, I quickly ordered a Diva Cup. I have used it for a few months now and I LOVE it!!!!
Even with heavy periods, if you use a menstrual cup, you can sleep all night long with no leaks. I no longer have to worry about bringing a stash of tampons with me wherever I go.
I also liked the green aspect of the menstrual cup. With a menstrual cup, I have no waste! None! Not even a panty liner!
Let me tell you about a menstrual cup. It is a silicone cup that holds your menstrual blood. You remove it, empty the liquid into the toilet. You only need to empty a menstrual cup 2-3 times per day, you can leave it in up to 12 hours so most people don’t need to worry about it at all during work. It has a little stem, you insert it, give it a spin to make a form suction and it stays in place with no leaks.
To get it out, you bear down, you grab the little stem and ridged base, pinch the silicone to break the suction, pull it out and dump the contents into the toilet, rinse it out with water and reinsert it.
I had never heard of one of these and I have to tell the world that it is soooooooo much better than tampons!!! Sure it costs about $30 bucks to start out but you will never have to run to the store for tampons, pads and panty liners each month. I realized I would spend about $8-10 bucks each month for menstrual supplies, the last two months I did not spend a dime.
I put my menstrual cup in a cute little zipped bag, I also carry around a little squeeze bottle filled with water for public bathrooms and that is it. No more panty liners, or tampons taking up my purse.
You can swim, exercise, run, dance, and there are no leaks. You don’t have to worry about toxic shock, leaking tampons, or wearing a sweaty pad. I hope I never have to go back.
Buying Half a Cow
Sep 20, 2010 Author: Jessy | Filed under: Food, Health & Safety, Product Reviews, Short StoriesI have always been a regular grocery store shopper buying my ground beef in bulk and using my vacuum sealer to save money. After watching the news about tainted beef, having to check lot numbers and worrying about the beef I already fed my family, then watching Food Inc. my priorities have changed. If you do not know the dangers of E. Coli Bacteria or have not watched Food Inc. you can find it on Youtube.com. Food Inc. opens your eyes and makes you think about the food you feed your family.
Besides having my own garden each summer, I think it is important to buy locally where possible in order to support local businesses. We live in The south side of the Twin Cities and there are many farms and ranches and farmers markets that make it possible to buy locally. I decided to try to buy a half a cow for my families beef. The search started to find a local, organic, free range cow to buy. The research started around April every local, online ranch being on average $5-8 dollars per pound of beef for certified organic beef. Most were already sold out for the season and they were already taking reservations and deposits for the 2011 season. I remembered that a woman I graduated with from high school and reconnected with on Facebook, mentioned the previous year that she sold cows from her farm, so I contacted her and asked for details.
My High School friends Ranch is located in Afton Minnesota, about 30 minutes south of my house. She had photos of her happy, healthy, young cows on her Facebook page. The cows had plenty of room to roam in grass, they were grass fed on no pesticide grasses, and were hormone free. These are the main important points of why I wanted to buy organic, but her cows also did not have the added cost of the organic certification process. She also had cows available to buy this year!
I put in my order for a 1/2 a cow, we have a big freezer in the basement and I agreed to split 1/4 of the cow with 3 other friends. The average for 1/4 of a cow is $400 and 1/2 a cow is $800 depending on weight.
She messaged me and said that they were bringing the cows in and to expect a call directly from the butcher shop in about 10-14 days. The butcher shop called me 12 days later and I gave them cutting instructions, how I wanted it packaged, (1 lb ground beef packs, 3/4 inch steaks, 2 steaks per package mostly boneless roasts averaging 2-3 lbs per roast.) I explained that I had never done this before to the woman on the phone and she was patient with me describing all of the options and what was common.
They butcher shop called me the next morning and told me I could to come pick my beef up. It was packaged in four large boxes two boxes with ground beef and two boxes with steaks and roasts and already frozen.
It was aged/hung for 10 days for flavor after slaughter.
1/2 of cow this cows dressed weight was 302 lbs
The price of the 1/2 cow including processing was $740.00
The price per pound dressed weight was $2.45
The weight of the beef processed and packaged was 219 lbs
The price per pound of processed and packaged was $3.37
I got about 120 lbs of steaks and roasts and 100 lbs of ground beef. Each package of butcher freezer papered meat is clearly labeled with my name to make sure I am getting my cow and the type and quantity of cut. You may be able to get your choice of cuts less expensive if you get every sale at the grocery store but you have no idea where your meat is coming from. I did not think that $3.37 per pound was too bad considering what you get when you average the cost per cut.
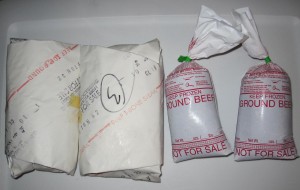
I ended up keeping a full 1/4 of cow split every other cut plus an additional 1/8 (after splitting 1/4 of the cow with 3 friends) of this cow for my family. I believe I kept 3/8 of a cow.
Here is the breakdown of my cuts.
-3 packages of soup bones
-3 packages of stew meat
-3 rump roasts
-1 sirloin tip roast
-1 beef arm roast
-4 beef chuck roasts
-2 beef porterhouse steaks
-9 T-bone steaks
-7 ribeye steaks
-11 sirloin steaks
-6 beef top round steaks
-55 packages of 95% lean ground beef
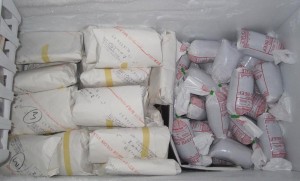
I had no idea what to expect since this was my first half of cow purchased, so I wanted to share my experience with others. I am truly pleased with my purchase, the hardest part was cutting a check for $740 bucks.
The aged beef is very meaty tasting, it tastes like eating a steakhouse steak each time we eat it. The beef adds much more flavor to your food than quickly processed grocery store beef. When you brown the ground beef there is no need to drain the fat, it is about 95% lean ground beef and there is no lack of flavor with the reduced fat. If you could buy 95% lean ground beef what would that cost per pound? The steaks are marbled and fabulous. I have made two roasts and they are flavorful without the 2 inch coating of fat at the top of my slow cooker.
Consider buying a local side of beef, know where your meat comes from, and taste the difference!
Here is the contact information where I purchased my beef: www.majesticpinesfarm.com
Here is the butcher shop who processed the meat:
www.gregsmeats.com
Henry Doorly Zoo, Omaha Nebraska
Sep 20, 2010 Author: Jessy | Filed under: Product Reviews, Short StoriesA few weeks ago we had a weekend open so we decided to go on a spontaneous road trip, not really knowing where we would end up. We packed up the truck, dropped the dog off at the Bed and Biscuit and were on the road heading south by about 5:30 PM after my husband got off work. We stopped at a rest stop, played a few games of green light/red light and kept on driving, we made it to Des Moines and the kids were still being good, (thanks to the dual screen DVD player, lots of movies, kid size headphones and plenty of snacks.) So we went westward and onward to Omaha, Nebraska. We made our reservation to our hotel 10 miles out of town, we stayed in the Holiday Inn Omaha Downtown Airport where they had a small water park, nice clean rooms, with a mini fridge, microwave and a coffee maker and friendly staff. This was the kids first time in a hotel we usually rent houses on vacation, and the kids loved it! As soon as we go them calmed down and settled in for the night we crashed too, we had to get ready for our fun day in the morning.
The next morning we woke up early, packed a lunch of peanut butter and jelly sandwiches, some granola bars, and snacks and lots of water in our soft cooler. We then shot out the door in search of breakfast, we found a little place called The Diner in the Old Market area surrounded by cobblestone streets and enjoyed some good greasy spoon food. We got out of there on full stomachs ready for the Henry Doorly Zoo.

As we headed down 10th street we came over the hill to see the Desert Dome and the whole family gave a collective “Wow” at that sight. We pulled into the big but already filling up parking lot, we went right to the right and found a spot at the back of the lot under a shade tree. The weather forecast called for 92 degrees and 70% humidity so shade was a really good idea and a nice thing, the parking was free! We loaded the kids, the cooler, the cameras and diaper bag into the double stroller we brought along and headed for the north entrance. The line was about 30 people deep, at each of the 4 registers but it went fast and we waited in the shade.
We are members at the Minnesota Zoo so we paid the zoo membership reciprocal fees and our son was free because he was under age 3, so our family entrance cost was $15.25. To put it into perspective, that is less than the admission price for one adult to the Minnesota Zoo.
We walked in and went to the first thing our kids noticed, the big red barn at Dairy World. They loved petting the goats, and the chickens. We made our way around the Budgie Encounter where tons of little parakeets fly around in a screened in garden and ate from popsicle sticks covered with bird seed from peoples hands. We checked out the Monkeys, Prairie Dogs, Raccoons, and the Peacocks with their babies. We looked at the Otters, and the turtles, took a picture of the kids in the Hippo’s mouth. We made it down the hill to take a quick ride on Sues Carousel, $2 per child seemed very reasonable to me. It was a nice way to spin around and cool off in the shade for a couple of minutes. We watched the Omaha Train but it was so loud the kids did not want to go on it. The steam engine was really neat to watch, with your ears covered!
We filled up on water and started up the hill, we went into the pretty screened aviary overlooking the birds, the creek and the lake. This was a pretty shaded area. We left there and went up and checked out the open air lemur area, the kids loved the Zaboomafoo lemur. Next we went to Expedition Madagascar building and took our time looking at the amazing number of Lemurs and other cute animals in that wonderfully air conditioned building! We refilled our water bottles at the fountains in this building.
Then we walked across the path up towards the Sea Lions area, and ate lunch under the Sea Lion Pavilion. After lunch is where the workout came in, we pushed the stroller almost straight up hill to see the elephants but they were worth it. They were healthy and happy looking elephants dusting themselves with dirt on the hot day. Magnificent animals! We walked around the corner and checked out the giant Rhinos and had to convince my daughter that she was too young to ride the Skyfari ride. She is too much of a dare devil to be that high off the ground!
We walked around the Lagoon and looked at the Koi pond and the monkeys then we entered one of my favorite places of the zoo, The Garden of the Senses. There were parrots and Macaws just sitting among the flowers on their perches, perfect to see from every side and a beautiful back drop for a photo opportunity. The pond, flowers and sculptures were really cool, I could have spent lots of time in this garden. My daughter loves parrots so she walked around and talked to each bird. We took the kids over to hit the giant gong.
We continued up the hill to see the Sable Antelope, the Bongo, the Red River Hogs, the Addax and then the Zebras. We stopped to watch the train again and took a break to sit down at a table with an umbrella, to sip a cold pop and watch the giraffes at their beautiful giraffe complex. They were really healthy looking giraffes in a nice shaded home, with lots of water.
We saved the areas with the buildings for the end of the day when the temperature would be the hottest knowing that we would really appreciate the air conditioning at that point. This zoo has lots of large hills so wear good shoes or else take advantage of the train or the tram to get you from one side of the zoo to the other. We walked the whole thing so it is certainly doable.
We continued up the hill and stopped at the Butterfly and Insect Garden. This was an air conditioned building with beautiful plants and trees and happy butterflies fluttering about. From that room we entered the insect garden area with giant spiders building webs in the open right over your head, and every freaky insect you have ever see on movies or TV and plenty you have never seen before! I had no idea there were so many varieties of scorpions or cockroaches. My favorite part of this building was the live honey bee hive that had access to the outdoor flower gardens and you could see the bees climb in and out the clear tube to make more honey. Very cool!
We walked up the hill to the Lied Jungle and were wonderfully surprised by this building! The diversity and quantity of different species of the animals that were housed in its beautiful rain forest gardens. There was a giant waterfall and cool overlook areas that made this building that appeared plain on the outside but surprisingly awesome sight once you entered! This is where the Tapir with the Tapir baby was housed, the gibbons, more macaws, pretty much all of my kids favorite animals.
From there we walked down the hill to the Scott Aquarium. We have a membership to Underwater Adventures at the Mall of America, but this building put that place to shame! The underwater tunnel was wide enough that you could park two cars side by side inside of it with tons of neat fish species! The coral reef displays were beautiful, the jellyfish tanks were cool but the coolest thing in my opinion was the tube of swirling fish! So cool! The penguin area was huge! My kids loved the dome that they could stand in and see the penguins from underneath the water.
We walked from there into the Wild Kingdom Pavilion, It was a pretty building and the giant frogs were neat but I couldn’t really figure out the purpose of this building unless you need a place to sit down.
We then entered the incredible Desert Dome, of course we had to stop at the huge boulder sized floating granite world fountain so the kids could try to spin that. The first thing you see in the desert dome was a giant mountain of red sand, so beautiful in itself. It reminded me of the red rocks in Sedona, AZ that we loved. Keeping the kids out of the sand was tough, they both wanted to touch the cool colored sand. We walked through the desert area, looking at the desert plants trying to keep the kids safe from the spines on the desert plants that were right next to the path, checking out the birds, and desert animals.
We then walked downstairs into the bonus area in the dome of the Kingdoms of the Night. The Kingdoms of the Night seemed to go on forever with dark rooms and countless night animals, snakes, lizards, birds, and the incredibly stinky guano room filled with tons of species of bats, that one we pretty much ran through because the smell made your eyes burn. Made me glad I did not pick bat zoo keeper as a career. Whew! We then came to an amazingly dark but really cool room with giant alligators right next to the bridge path, Huge Alligators! There were also beavers and caymans. We walked into another giant river fish tank room and finally made our way upstairs and back out into the light. It seemed like we were in the dark forever this exhibit space was so large, it took my eyes a few minutes to re-adjust to the light.
We walked down to the Hubbard Orangutan Forest and looked at the beautiful orangutans and other primates. We walked into Hubbard Gorilla Valley we were in awe at the Gorillas, such magnificent huge animals! The baby Gorilla was so cute and the giant silver back was so intelligent looking it was almost frightening to look into his huge eyes as he stared at us through the glass. Wow!
It was starting to get late and the zoo was starting to clear out, so we took a fast glance at the cat Complex as we walked by, stopped at the Durhams Bear Canyon. We looked at the nice bear homes with lots of sleeping bears and made our way back up the hill to the North Entrance. We slowly made our way out of the zoo with sore feet to our truck, loaded the stroller back in the truck and truly enjoyed the air conditioning. Even with the humid heat and sore feet we had a great time at the zoo. I am awed at how many animals they had there and species we have never seen at any other zoo we have visited.
We gave the kid snacks and fought to keep the kids awake on the 10 minute ride back to the hotel, quick dressed them in swim suits to hit the water park for a while. We quick cleaned up and went to the Texas Roadhouse for dinner. The kids were both beat but loved watching the servers dance and loved eating the peanuts. We came back to the hotel and both kids crashed fast and so did both parents!
We slept in a little bit later the next morning, drank a good cup of coffee, packed up our stuff, loaded up the car, ate breakfast in the car and were on our way back to Minnesota. We stopped for lunch at a small little restaurant called the Dairy Dandy in an even smaller farm town in Iowa. That quiet town was no match for our full of energy kids! We jumped back into the truck then drove to Mankato, MN for the Minnesota Vikings training camp on the way home. We let the kids stretch their legs and buy some Vikings gear, then we piled in the truck for a quick jaunt home for the end of our road trip.
It was a nice weekend to someplace we had never visited before. The kids loved the Henry Doorly Zoo and are still bringing up some of their favorite animals they saw there. If you have a weekend and want to check out an affordable, friendly zoo, drive to the big town of Omaha, Nebraska and check out the Henry Doorly Zoo!
Dyson Ball, A Fun Way to Clean
Feb 21, 2010 Author: Jessy | Filed under: Product ReviewsOne day my old Dirt Devil vacuum cleaner stopped sucking, the brushes would spin but would no longer suck up anything. I cleaned it and I replaced the filter. I was covered with the nasty dirt and dust that had accumulated in the canister from 2 years of use. Yep that was it, just 2 years and it died. That was the same with my vacuum prior to that, only 2 years then it died too.
My husband tossed it out to the trash and said he was going to pick out the vacuum this time because he knew that if I went to the store I would just go get another reasonably priced vacuum like for the previous two. I had no clue what he was going to get, he spent an hour at Best Buy and he came home with the Dyson DC25 Ball All-Floors Upright Vacuum Cleaner. I was shocked because I would not have spent that kind of money and bought a Dyson Ball!
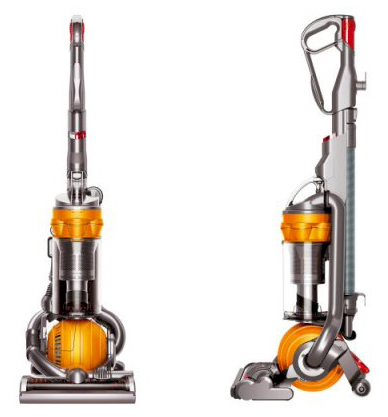
He set it up and I was truly excited to try it. My old vacuums with the wheels had to have the settings changed every time I changed vacuuming surfaces from the hard kitchen floor and kitchen rugs to the living room carpet to the frieze in the bedrooms, four times I would have to adjust the vacuum just to clean my upper level. With the Ball there is no changing of heights to go from one surface to the next, If you want to vacuum the kitchen floor and get the rug next it is seem-less and no stopping to change levels. The wheels verses ball is no contest, it is unbelievable how easy it is to vacuum with, my 2 year old can easily vacuum the floor and he loves to do it. You can whiz into every corner and narrow area with no effort at all. My living room carpet had a lie, and one direction was harder to push a vacuum than going against the lie. When using my old vacuum it was an arm workout trying to go towards against the lie, with the Dyson it was no effort at all.
When people come over I offer them the chance to try the vacuum. My sister vacuumed with it and she said it is so easy she wondered if it was even working? I said yep check out what you are picking up! She is used to her heavy normal vacuum that truly is a workout that pushing around the Dyson Ball is like night and day.
It has a 5 year warranty against breakage. 5 whole years! Maybe I will have a vacuum that will last more than the typical 2 years of my previous two models. I hope I don’t need it, but I appreciate it because I am certainly not easy on vacuums.
Instead of buying new filters you simply cleaning the filter with water and let it dry every 2 months. I used to hate having to make a special trip to the store to find a filter, remember the letter and hope it fits in the vacuum like I used to do with my old vacuums. No bags, no filters to buy. Awesome, that saves you money right there.
The easy to clean canister! I love the canister, with my last vacuum I used to have to unclog it by sticking my hand up to my elbow to clean out the clogged hair and dust stuck in the top of the canister. I never understood what the benefit was to having no bag when I was constantly touching the dirt I picked up. With this one, It is a wide open canister, you push the button to release the bottom and the dirt falls out, no unclogging required! No dirty hands and elbows!!!
The hose attachment is strange and does not bend much but it gets the job done, when doing stairs I prefer to use the hose and the ball is nice and light so I am not breaking my back lifting it up stairs, it also stops spinning all together when you pull out the hose so you are not wearing a hole in your carpet to vacuum corners and stairs. I am not a big attachment girl in my eyes it is just more to loose and fall off when I am moving the vacuum up and down stairs so the attachments that came with it are perfect for me. There is a pointed nozzle a soft bristle attachment for that and a flat head for lint removal.
I have only one complaint about the design, I wish the cord was longer.
I realized when I encouraged my little brother and his wife to buy one the other day that I needed to write a review. I have had my Dyson Ball for over a year now and still love it! The Dyson Ball makes vacuuming fun and does a fantastic job of cleaning my floors. The Dyson Ball really is that awesome, in my opinion it is worth every penny.
Categories
- Family Management (26)
- Food (21)
- Health & Safety (32)
- Home & Garden (13)
- Park Reviews (4)
- Product Reviews (12)
- Projects and Crafts (2)
- Short Stories (23)
- Think About It (25)
- Uncategorized (6)
Top 10 Lists
Blogs this Month
| M | T | W | T | F | S | S |
|---|---|---|---|---|---|---|
| « Aug | ||||||
| 1 | 2 | 3 | 4 | 5 | 6 | 7 |
| 8 | 9 | 10 | 11 | 12 | 13 | 14 |
| 15 | 16 | 17 | 18 | 19 | 20 | 21 |
| 22 | 23 | 24 | 25 | 26 | 27 | 28 |
| 29 | 30 | |||||
Archives
- August 2016
- June 2015
- July 2014
- April 2014
- January 2014
- January 2013
- December 2012
- September 2012
- August 2012
- May 2012
- February 2012
- January 2012
- September 2011
- February 2011
- January 2011
- December 2010
- November 2010
- October 2010
- September 2010
- August 2010
- July 2010
- June 2010
- May 2010
- April 2010
- March 2010
- February 2010
- January 2010
- December 2009
- October 2009
- September 2009
- August 2009
- July 2009
- June 2009
- May 2009
